Summer in a Bottle – Fermented Chilli Sauce


img_20180224_134756.jpg

I’ve had a fabulous crop of chillies so far and this season I really wanted to experiment with fermenting for flavour.

The Habanero chillies in particular have been really prolific this year and while not as hot as past seasons, incredibly flavourful, with a citrus tang that I thought would make a great sauce.

So, here’s the recipe I developed for the ferment and the subsequent sauce. I’ve tried to include as much detail as possible about my process, but as always, please ask if there’s something I’ve missed that needs clarification!

Fermented Hot Sauce 


Ingredients:

Fresh chillies (I used ripe Habaneros from my garden)

Salt (cooking or kosher salt without additives is best)

Water (filtered or rain water boiled and allowed to cool to room temperature)

(For the sauce) Lemons, vinegar or citric acid (available in most supermarkets as a powder in the baking needs section).

You’ll also need gloves (if the chillies are Habaneros or hotter this is necessary!), some reasonably accurate kitchen scales and measuring spoons, a scrupulously clean jar, a weight to hold the chillies down and a lid that can accommodate an airlock or similar. Even with small ferments, I prefer to exclude any organisms other than what’s on my fruit or vegetables. I’d also recommend a book of litmus paper (available from most chemists) to check pH levels of the final product, especially if you’re not planning to put the sauce through a water bath.

Ferment Method:

Before starting, clean everything – otherwise your ferment can pick up organisms you might not want! Sterilise jars, lids, weights, measuring spoons and anything metal in boiling water, thoroughly clean chopping boards, knives, bowls and gloves in hot soapy water and rinse thoroughly.

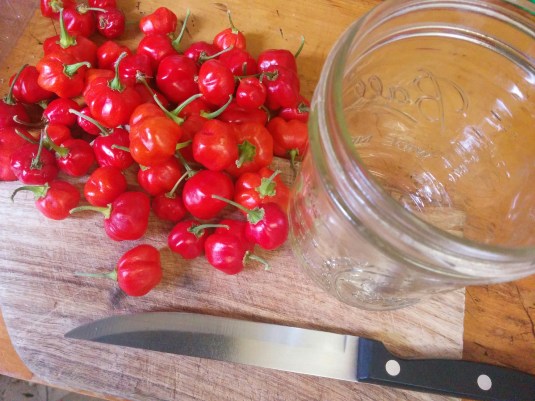
Wash the chillies and dry them carefully. With gloves on (if you’re using hot chillies) remove the stalk and chop the chillies. I like the heat, so I left the seeds and membrane in, but if you’re looking for a more mellow and somewhat smoother sauce, cut the chillies in quarters and scrape out the seeds and inner membrane with a paring knife.

Weigh the chillies and pack them tightly into the clean jar. You can either sprinkle the salt over the chillies (which I did) and pour the cooled water over them or mix the salt until it’s fairly well dissolved in a small amount of water. I went for a roughly 8% solution and had 200 g (7 oz) of chopped chillies. This meant needed 16 g salt, which is a scant tablespoon. (My old spring loaded kitchen scales aren’t designed for very small amounts but digital scales are perfect for this job).

IMG_20180224_141454

Once you’ve added the brine, it’s important to twist the jar a few times or push the chilli pieces around with a clean skewer to remove as many air bubbles as possible and weigh the chillies down so they are entirely submerged. I use wide mouth Mason jars with easy to clean glass weights and a silicone Pickle Pipe – a waterless airlock that allow ferments to release carbon dioxide, without allowing air (and unwanted organisms) in. Then cover, label and leave in a dark, cool place for about a week.

I keep my ferments in pantry shelves that I walk past all the time, so I tend to check them once a day. It never ceases to delight me, seeing bubbles, smelling the wonderful aromas and particularly with this ferment, seeing the colour really develop. It’s also a good habit to check your ferments to make sure nothing has risen above the level of the brine and no unwanted moulds have developed.

IMG_20180224_142433

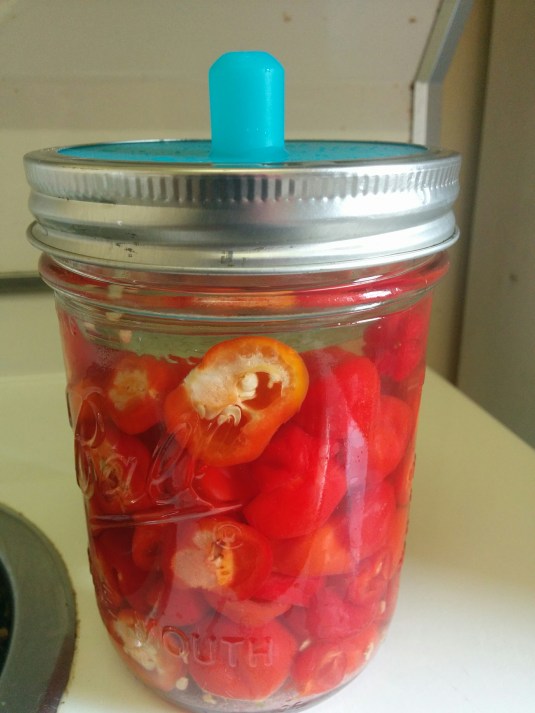
Fermenting Habanero Chillies, weighed down with a glass insert and covered with a Pickle Pipe.

After a week to ten days, check your chillies (I left mine for a week). They should still be submerged and reasonably crisp, and the brine should smell good and taste spicy and salty. It’s quite normal for a thin film to form across the top of the brine and I recommend removing this carefully with a spoon. If any chillies aren’t submerged and showing signs of mould, I would recommend removing the uncovered ones carefully from the brine (toothpicks are good) and composting them. The rest of the ferment should be fine. Of course, if you’re assailed with funky smells and your chillies are slimy, don’t take any risks – throw the whole lot in the compost bin – food poisoning is not to be trifled with!

If you’re happy with the ferment, here’s the rest of the recipe:

Sauce Method: 

Once again, assemble all your tools first and make sure they’re ridiculously clean – preferably hot water or heat sterilised. You’ll need a non-reactive sieve and bowl, a food processor or blender, a small funnel, bottles and caps and (if you opt for lemons) a grater and hand juicer or citrus press.

Remove the weight from your ferment and sieve the brine off the chillies into a bowl. If like me, you’re chilli-obsessed, reserve the brine (it’s deliciously spicy!) put it in a clean bottle, cover and refrigerate. It will keep for a few weeks in the fridge and I use it in curries, stir fries, soups or stews for an extra kicking salt replacement 🙂

Put the chillies into a blender jar or food processor with either vinegar, fresh lemon juice or citric acid powder and pulse to the desired consistency. I also added a tablespoon or two of the brine. The target here is to bring the sauce to around 4.5 pH – quite sharp. I used the juice of 3 lemons and, for extra citrus notes, the grated zest.

IMG_20180305_181249

Next, carefully put this into the sterilised jars and seal immediately. It’s possible now to put the jars in the refrigerator where they’ll last for months and be full of probiotic goodness, but I’m here for flavour – so I opted to do a water-bath sterilisation for 10 minutes This stabilises the sauce, guaranteeing longer pantry shelf life.

This sauce is sensational with – well, pretty much everything! My original 200 g of chillies made two 125 g bottles plus a few tablespoons that I’ve put in a sterilised jar and refrigerated. It’ll be interesting to see if there’s any significant flavour difference between the water-bath processed sauce and the refrigerated version.

IMG_20180306_074802

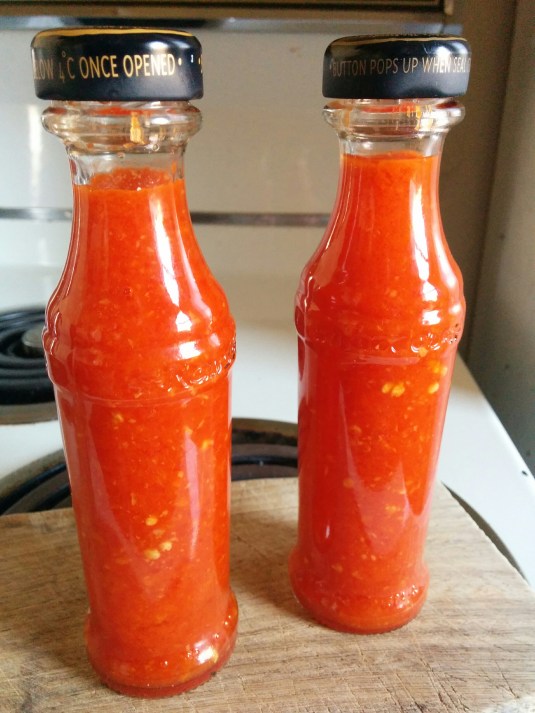
The finished product after water-bath processing – that beautiful colour!!!

I think this basic fermentation would work with any chilli and I’m going to start one with Cayenne chillies and garlic later this week that I plan to finish with my home made Apple Cider Vinegar.

Let me know if you try this recipe, what flavour combinations you use and how it works out – I always love to hear from you 😀

Meanwhile, take care wherever you are on this beautiful planet ❤


Aioli – The Love Affair

Hi everyone,

I just posted a pic on Facebook of a batch of Aioli I made this afternoon and one of my friends asked for the recipe. Easy done I thought, I’m sure it’ll be on my blog somewhere – but I couldn’t find it! High time I rectified this incredible oversight!

I’m not a true mayonnaise connoisseur like some of my friends and in truth, I rarely eat it. I do like to make this however in summer and autumn, when eggs are plentiful and garlic is still fresh and pungent. And I dug late potatoes this morning, a Dutch cultivar called Patrone that are apparently a fabulous salad potato. I’ve never grown them before, so this week will be full of interesting taste tests 😀

Home grown/made potato salad and Aioli is one of those dishes that is sex on a plate, everything about it screams wonderful. The texture of the potato cubes, their earthy flavour against the rich, creamy Aioli, with the pungent garlic and the lemony tang at the finish. You get the picture? This is love! And I make this only three, maybe four times a year, when everything required is in season.

So, here’s the Aioli recipe. Please bear in mind several things. Firstly this uses raw eggs so always get them from a reliable source and be assured they are fresh. Secondly, that I make this by feel and taste and recommend that you do the same. I used 8 eggs for this batch as I’m giving a pot to a mayonnaise-obsessed friend too. My rule of thumb is a clove of garlic per egg yolk and it works well for me. The finished Aioli will keep for a week in the refrigerator, though it usually disappears very quickly at my place!

Aioli 

Egg yolks                  Fresh minced garlic             Olive oil                 Lemon juice           Salt

In a clean bowl separate the eggs (I freeze the whites for later use in baking). Crush, peel and mince the garlic (I sprinkle a little salt on the crushed, peeled cloves and mash it in with the flat of a cook’s knife, making a particularly fine mince). Add this to the eggs and beat them well until they’re frothy. Here, you can use a hand beater but I prefer a balloon whisk.

7 eggs that looks like 8 – spot the double-yolker!

Very slowly add the olive oil while beating the egg mixture. A thin drizzle is best – you really don’t want this to split! (I put a teatowel on the bench to stop the bowl from flying away too). For my 8 egg yolks I used  a very generous cup of my Basil Oil for an extra summery note but any good extra virgin olive oil will be fine. Keep beating until the consistency is like thick cream. Once you’re happy with this, start adding the lemon juice. I recommend beginning with half a tablespoon per yolk and do a taste test. Adjust as needed and add seasoning if you want. Pot up, label and refrigerate immediately.

Apart from making the sexiest potato salad dressing in the world, this is wonderful with chicken, fish, green salad and as a dipping sauce.

Enjoy 😀

Stay well friends, and I’ll see you soon ❤

Well Hello Summer! – Day 20 NaBloPoMo

Today was quite spectacular – brilliant, sunny and really quite hot. Too nice to be stuck inside with assignments, so I spent the day working on getting the garden up to date because it looks like summer’s here!

It was too hot to work in the greenhouse today, so I set up a work area outside on top of the currently empty rabbit nursery hutch. With a cold bottle of water and a good audio book (Mr. Midshipman Hornblower by C. S. Forester) I spent quite a lot of time getting seedlings into tubes.

img_20161120_120028

It was a lovely place to work but here in Tasmania the sun is deceptively intense. I’m quite fair skinned and burn easily so I usually wear long sleeved cotton shirts, long pants and a hat when I’m out in the yard. Silly me forgot to roll my sleeves down after I did the watering this morning and after 10 minutes sitting working, I could feel my forearms burning. It’s not too bad tonight after a shower and plenty of soothing skin cream but I really try and avoid getting too much sun.

I potted up a lot of seedlings today – especially eggplants and basil – into toilet roll tubes. It’s an effective means of recycling an otherwise useless product and because the cardboard tubes disintegrate, it pretty much eliminates transplant shock when the seedlings go out into a garden bed or into a larger pot. If you’re interested in reading more, I wrote about it here.

Later in the afternoon, I made a wonderful discovery. I was weeding the path in front of the main raspberry bed when a flash of colour caught my eye – raspberry season has officially  started!

img_20161120_151755

And they were delicious – worth getting a little bit of sunburn earlier in the day 😀

To finish, Bernard Black is very well settled in and getting very inquisitive about his surroundings – and eating lots!

img_20161120_092556

Tomorrow is submission day for final assignments and discussions about future units. In particular, what am I going to do for my final year project. I’ve got a few ideas but I really need to run it past some of my tutors.

Lots to think about!

A Day In The Life – Day 7 NaBloPoMo 2016

This post came from an idea one of my friends gave me this afternoon. So here’s a day in my life……..

Today was Monday, and a day off from my usual work at Oak Tasmania. But there were all the usual jobs and dinner to prepare early because I also had a 1500 word essay to upload to my tutor for my current creative writing unit, Writing For Children and Young Adults

First, feed the animals. There was squawking and jostling to get the best position, but the chickens all got their share of seed mix and there was an early egg from dear Hipster, the oldest girl in the flock. Then some quick weeding to gather greens for the rabbits and a big chicory leaf for each of them (because rabbits!) and the obligatory cute Bernard Black Bunny pic of the day……

I'm Cute - But I Will Not Share My Chicory!

I’m Cute – But I Will Not Share My Chicory!

Once everyone was fed, water checked, pats and cuddles given, I watered the greenhouse and picked veggies for tonight’s dinner, a slow cooked beef and veg curry. This involved picking celery, purple cabbage leaves, silverbeet and snow peas and (as always) more weeding around the plants and cutting back flower heads – all of which went straight to the ravenous chickens.

Finally, I managed to get back in the house and make some breakfast for me! This morning I felt like something savory on my toast. So, before I went to feed the animals I went searching through the freezer. I had the last of my current loaf of sourdough toasted with a very decadent and different kind of topping. I was quite thrilled to find a tub of basil pesto (sans pine nuts) from the autumn harvest tucked away. By the time I got back to the kitchen it was defrosted enough to spread thinly on my toast. It was intense, both garlic and basil flavours came shining through and utterly delicious!

img_20161107_103636

Time then to knock a loaf of sourdough together and put dinner in the slow cooker. I replaced some of the bread flour with rye this time, which makes a nutty, slightly denser loaf. Wee Beastie the sourdough plant is really powering at the moment, so this is what it looked like after a few hours of proving under a damp tea towel in the kitchen.

img_20161107_170851

I cannot begin to describe how lovely and yeasty these loaves smell at this stage – and without any added yeast! I’ll leave it to prove overnight and bake it first thing tomorrow morning so I’ll have fresh bread for breakfast ❤

Next on my list was getting dinner prepped and in the slow cooker. About 500g diced stewing steak and a couple of diced onions got seared in ghee and tossed into the pot with a jar of home-made tomato based chilli sauce from a couple of seasons ago and a tub of cooked chick peas. Lots of spices, herbs, red wine, plus celery, carrot, broad beans and mushrooms (thanks to the garden again!). All thrown in the slow cooker, switched on and forgotten about until later in the afternoon.

img_20161107_165143

Then it was down to the nitty gritty – wrangling all my notes into a cohesive discussion about what I consider to be “an area of childhood that hasn’t been satisfactorily written about”. It’s a potentially huge subject and I only had 1500 words to work with. Chained to my laptop for the next few hours, I referenced, edited and pulled it all together – with Brahms in my headphones and the first cricket test against South Africa on the television. It was a bit mad for a few hours, I remember getting up and making a cup of tea at one point but apparently didn’t drink it, and some kind soul put food in front of me at lunchtime. But I managed to get it all done, correctly formatted and uploaded to my tutor who lives in a different time zone.

img_20161107_171825


After a cuppa with a friend who called round, it was time for the afternoon feeding of the hungry hordes, more egg collecting – and bunny cuddles ❤

I also picked some snow peas that I’d missed that were way too far gone for the table but rather than waste them, I shelled them and set them to dry on my seed shelf. They’ll form the basis of the next crop and/or traded with other fellow gardeners.

img_20161107_163754


Finally, I prepared the veggies to finish off the curry, silverbeet, purple cabbage and snow peas while some nice person cooked rice.

img_20161107_165934

And now, dinner has been devoured (delicious!) and there’s plenty of leftovers to refill the freezer. I’m currently crashed on the couch with my laptop watching my favourite current affairs show, The Feed on SBS and once I publish this I might get back to reading my new book, Jennifer Livett’s Wild IslandOr maybe think some more about that song I’m starting to write. Or perhaps do a little work on my final assignment for this unit, a creative piece of writing and exegesis.

Or maybe go to bed early.

And this was a day off……

Boxes and Bounty

As a gardening experiment last month, I made a few wicking boxes for my front balcony. It faces east, across the River Derwent and while the view is lovely, it gets all the morning sun and can be quite windy. This time of year, we can’t walk on the concrete in bare feet before 2pm! I’ve grown salad greens in containers out there since I moved in, over six years ago but it’s a lot of work and difficult keeping water up to them with baking sun and drying winds.

IMG_20151215_102432I started out buying two food grade plastic crates from my local hardware store (I think they were 23 litre size), the kind that are often used as recycling boxes. All other materials were either recycled or things I had on hand.

Old hose was spiked with holes and laid in the bottom, with the refill end slotted into a length of larger diameter poly pipe to make it easier to pour water into. It looks pretty ugly but it works!

Next, I put a layer of gravel over the hose, making sure the refill end IMG_20151215_102947didn’t get buried as you can see in the photo. By the way, this gravel wouldn’t be my ideal but it was sitting in a pile begging to be used up and there was just enough to do all the boxes 🙂

At the top of the gravel, I carefully drilled a small overflow hole diagonally opposite the refill hose. This means water won’t build up and start getting smelly and the plants won’t rot in overly wet soil.

IMG_20151215_103048Next, I covered the gravel with some old tea towels that weren’t really wonderful for wiping dishes anymore. They allow the water to pass through but not the soil. Eventually, they will rot away and I’ll have to replace them but it was good to recycle them. Old shade cloth would be ideal if you have it.

At this stage, I put a thin layer of good quality potting mix over the top, and I recommend not cutting any corners with this. The better the soil, the better the plants! I mixed well rotted sheep poo and plenty of mushroom compost in large bucket and worked this through layers of potting mix until the box was fairly full. The result was a friable, rich mix, perfect for quick growing summer salad veggies.

I made sure the soil was damp before planting out the first seedlings and watered them overhead for the first couple of days, until the water reservoir started to do its thing. I ended up doing eight boxes in total and crammed in fast growing Pak Choi, Portulaca, Red Amaranth, Grumolo Verde Chicory, Garland Chrysanthemum and even Silverbeet. The results have been fabulous

IMG_20151215_110116

The pic above was taken 15th December 2015 and the pic below a month later, the 14th January 2016. The results have been incredibly successful and I’m only having to refill the reservoir about once every three or four days instead of overhead watering morning and night. Despite the fact salad is my favourite meal of the day, I can barely keep up with the amount of food these boxes are producing!

IMG_20160114_173535

Do you grow vegetables in containers? What are your top tips? Please leave a comment below – I love to hear from you all! 

Raspberries – The Birthday Week Continues

Ok, I know that NaBloPoMo is over for another year and I was going to have a break from blogging – but I had to share this with you all.

Today I spent the morning gardening, collecting eggs and picking more raspberries and this afternoon we baked a Raspberry Cheesecake and Raspberry Upside Down Cake for my birthday tomorrow. Here’s the recipes – they’re both very easy.

Raspberry Cheesecake 

Ingredients:

1 prepared biscuit base (for a 28-30cm spring form pan)

6 large eggs     3/4 cup of sugar     500g cream cheese (at room temperature)

2 cups of fresh raspberries (more if you have them)    1 tablespoon lemon juice

Method:

Break the eggs carefully into a blender jar, add the sugar and cover. Pulse until the eggs are frothy and the sugar is combined. Spoon the softened cream cheese in, cover and blend until smooth. Add the lemon juice and approximately half the raspberries and pulse. I like to do this very briefly so there are still chunks of fruit and the colour swirls through the cheesecake mix.

Pour this carefully into the prepared spring form pan and decorate with the rest of the whole fruit. Bake at 150 C (300 F) for about 45 minutes. Allow to cool completely and chill for at least two hours before eating.

IMG_20151201_183215

Raspberry Upside Down Cake

Ingredients:

4 large eggs, separated         3/4 cup of white sugar      1 cup Self Raising flour

1/4 teas Bicarbonate of Soda    3 tabs butter    4 tabs milk   1 cup fresh raspberries

a few drops of Vanilla essence (optional)

Method:

Preheat the oven to about 200 C (400 F). In a small saucepan, gently melt the butter. Brush a Bundt pan with a little of this and put the raspberries evenly on the bottom. Put the Bundt pan aside while you prepare the cake batter. Add the milk to the butter and turn off the heat. Do not let this boil!

Mix the egg yolks in a small bowl and put aside while you prepare the egg whites. Beat the egg whites in a large mixing bowl until soft peaks are formed. Slowly add the sugar and beat back up to soft peak stage after each addition. Very slowly sift the flour and Bicarb in and mix it thoroughly, ensuring there’s no pockets of flour left.

Slowly pour in the now lukewarm milk and butter and fold it through. Pour this very carefully over the raspberries in the Bundt pan.

Turn the oven down to 150 C (300 F) and put the cake onto a shallow tray. Pour hot water into the tray to create a shallow water bath and bake the sponge for 25-35 minutes.

Allow to cool for 10 minutes or so on a cake rack before carefully turning out onto a plate. Serve slices with cream and extra fresh berries.

IMG_20151201_183206

A Day of Quiet Bliss – Day 29 NaBloPoMo 2015

It was very overcast and quite humid in Hobart most of today. Although I was supposed to go to an event nearby, I decided to stay home and potter around the garden. The girls were very pleased because this meant lots of extra treats for them and they rewarded me with eggs as usual. Boudica Bunny is also eating enormous amounts at the moment and all the babies are out and starting to get the hang of this eating solid food caper.

IMG_20151129_153439

I potted up more basil, chillies and Green Shiso (Perilla fruitescans var. crispa), a wonderful Japanese annual herb, which I primarily use in stir fries and salads. I’ve grown it in the past but never had such a fabulous strike rate as I did with this year’s seed supply. It’s looking wonderful and already has that unmistakable flavour and aroma. I find it likes a rich potting mix and lots of warmth for quick growth, similar to basil.

And then there was the completion of half the “corner of shame”. This is a classic before and after situation.

IMG_20151031_103701

Before

IMG_20151129_152821

After

Admittedly, we’re only half way there but that’s a lot further than we were a few weeks ago!

After removing the worst of the perennial weeds, I put some dolomite limestone over the area and covered it with several layers of cardboard.  Then we laid some cotton mats, donated by family members, that were old and worn and heading for the rubbish tip. (I think half our garden is recycled!)

A thick layer of coarse sand went over that and it was topped with some well composted native bark mulch, which I’ve found considerably less acidic than pine bark mulch. We did the same thing behind the chicken house and I’ve planted two Australian Tea-Trees (Leptospermum sp.) there to provide some extra wind protection for the ladies who lay.

The weeds will grow back – but not as quickly or as vigorously as they have in the past. I want to plant a couple of English Lavender here in the next few days and I’m planning to put netting or shade cloth above the fence to give a little more height for growing climbers in tubs and privacy both for and from our neighbours. Next spring, this is the likely spot for my beehive, angled in towards the garden.

I also finished the garlic crop, which has been curing inside the last two weeks. It’s now cleaned up, the tails have been clipped and it’s in three plaits, hanging off the laundry/kitchen door. It’s quite a decent amount this season, considering I’ve used and given away at least half a dozen or so heads already – and there’s more in the ground that needs pulling!

IMG_20151129_165218

Tomorrow is back to music work and teaching, the beginning of my birthday week, first day of my next university semester and the last day of NaBloPoMo – and I’m picking up my birthday present to myself tomorrow too 😀


Winter – Southern Style

March Snow 2015

Wow, it’s June already! Who stole my year and can I have it back please? I don’t know about the rest of you but life’s been a blur the past six months.

Yesterday was the first day of winter here in the southern hemisphere and it was a reminder that the year is marching on. Firstly, there was snow on the mountain, our second reasonable fall in a couple of weeks. Yes, we had heavy snow in March this year, very unusual for this part of the world (see the pic above, snow to approx. 200m/220 yards!) The garden is looking a little shabby as it always does this time of year, with fallen leaves that need raking and using as mulch, fruit trees that need attention and weeds competing with winter vegetables. Nevertheless, I love winter gardening in Hobart on those crisp, sunny days that we generally see so many of through June and July.

The chickens are looking equally tatty, all five of the old girls are in various stages of molting, and because of the shorter day length, no eggs at present. On the up side, the rabbits are thriving. They much prefer the cooler weather and all three have very luxurious winter coats, plenty of food, bedding straw and shelter.

Bunnies at Breakfast 2 June 2015


Out of view in this photo is a heavy duty enclosure that I’ve fitted with a tarp, where each of the bunnies gets a chance to run around, feast on grass and get plenty of exercise. I have been known to go and have a break in there with them, which usually means rabbit cuddles. Life’s hard ❤

And June heralds a new study period at online university, this time my first unit for a Creative Writing major. It’s really interesting as a much-lauded songwriter and lyricist that I’m going back to basics but my mantra throughout life is that you can never know it all – there’s always new things to learn.

As I’ve mentioned here before, I’m studying online through Griffith University and even a few days in, I’m really enjoying the course material, meeting new people on the discussion board who have a similar passion for words and the prospect of learning new things, new ways of doing what I love.

Hopefully, this will mean more regular blog posts!

Take care everyone and see you soon

Debra ❤

Whining and Winning

I’ve been complaining – no, let’s give it the proper title – whining for weeks about the weather.
After gorgeous sunshine yesterday, and nearly a full day weeding, I woke up to leaden skies and my buck rabbit Barabas, thumping the ground to let me know a thunderstorm was on the way. I love a good thunderstorm, though the rabbits and chickens probably wouldn’t agree but the rain is back. And frankly, we’re all sick of it!
The only positive things are the water tanks are still full and the amount of green feed we’re getting for the chickens and large growth of treats for the rabbits – chicory, nasturtiums, thistles and blackberry leaves especially.
To give you some idea of what I’m facing, this is a picture of a garden bed – not a weed patch.
image

This was last weeded and mulched six short weeks ago. Underneath all this is a lovely small-growing bottlebrush that brings native birds into the garden, garlic, potatoes, cauliflower and silverbeet. I made a start yesterday but after the storm passed this morning, I couldn’t quite face mud-filled boots, so I switched to weeding the raspberry bed.
This has been another of my ongoing experiments. Last year I tried planting bare-rooted canes along my north facing wall but some very inventive starlings and a ridiculously hot summer saw all casualties and no survivors.
This winter, I tried again with a few bare-rooted canes in a raised bed in front of the greenhouse – with ample bird-netting! And again, nothing! But I did get a brilliant crop of mushrooms, so no real complaints.
In desperation, I bought a pot of sprouting Chilcotin canes from the local hardware centre a few weeks ago and literally emptied the pot into the bed alongside the canes that didn’t take. Finally, raspberries are growing and forming beautifully in my garden. Imagine my surprise then, as I was about to pull out what I thought was a dead cane today and spotted new growth from the base of two seemingly dead canes!
After all that whining, finally a win!

Elusive Spring

As you’ve probably gathered, the weather in southern Tasmania has been pretty awful, with unseasonal rain and colder weather. As we come to the end of November, it’s starting to feel like spring – about three months later than expected!
This morning I couldn’t sleep, so was up and out in the yard before 7am. It was damp and cool, but lovely. Undoubtedly my favourite time of the day and the chickens and rabbits were happy to see me – and get an early breakfast!
All the wet weather has played havoc with some of the plants. The few tomatoes I have outside are struggling, as are the corn and zucchini plants. Berries are the hardest hit, but my Chilcotin raspberries are in a raised bed and covered with bird netting so I think there’ll be a few sweet treats by Christmas. The boysenberry (a new addition) has set a few fruit so now the big issue will be keeping the birds off.
After the disastrous heat of last summer, I lost all but one of my strawberries. So in winter, I potted up the last little survivor and put it in the greenhouse for safe keeping, waiting for runners so I could propagate more plants.
Imagine my delight when I went in to water this morning and found not runners but a clump of perfect fruit – and some ripe enough for breakfast. Let’s hope that spring is finally here 😀
image

Previous Older Entries