Felicity’s List – Paying it Forward

Some years ago, one of my music students, Ruby Grant (who’s also one of the most amazing women I’ve ever known) introduced me to her friends Felicity and Dave at a party. I was really taken with this young couple, who (like Ruby) were smart, interesting and really good fun. Originally from the UK, they’d ended up in Tasmania. Occasionally, I’d see them at gigs and we’d bump into one another from time to time on Facebook. (In a town as small as Hobart that sounds ludicrous – but it happens!)

Then, in 2015 Felicity started a blog “About That Cancer Thing” and announced that at 33, she’d been diagnosed with bowel cancer. She was young, fit and otherwise healthy so I think we all thought that she’d get through this with her usual quiet determination. In her blog, she documented her treatment and what it’s done to her life, the joy of being able to go for a walk with Dave, their disappointment at not being able to have a family, and the financial impact her treatment and ongoing care has had on their lives.

To that end, Dave and Felicity set up a Go Fund Me page to try and see if they could raise money to keep their dream of a family alive and to help with the incredible costs of being so ill.

A couple of weeks ago, Felicity posted that the meds were no longer holding the cancer back and as she so eloquently put it,

“You can’t protect people. You can try. But it’s not really protecting them. I thought I was protecting people. Then I wondered if I thought I was protecting myself. But actually I was just delaying peoples opportunity to process the truth. Learning this didn’t really change my behavior though”.

Then a couple of days ago, Felicity posted “Wrapping Up” and at the end, a list she wrote some months ago when she was better than she is at present.

I urge you all to read it, as it is a wonderful, practical, uplifting and utterly inspirational thing.

To the best of my knowledge, Felicity is still at home with Dave and I hope they are enjoying the gentle drizzle of this warm autumn morning. If you can afford to, please donate to help offset some of their crippling medical costs.

And act on Felicity’s list ❤

Venison Jerky

It’s autumn here in Hobart, though you could be forgiven for thinking it’s still summer at the moment! The sun is shining and the tomato harvest seems to be stretching on and on this year. The deer season opened in Tasmania a few weeks ago and, while I object to shooting a living creature just because you can, I have no problem with hunting if the animal is killed humanely and all the carcass is used.

I was gifted a shoulder of venison last week by family members who hunt. One deer provides a lot of meat shared throughout the clan, including mince and home-made sausages as well as the usual roasts and stewing pieces. I took my my shoulder home and wondered how I was going to use it.

As I walked in the kitchen, I spotted the dehydrator (it’s hard to miss!) still out on the bench after drying all the prunes this year, and made up my mind to try some jerky. I haven’t made jerky in a dehydrator before (only on a Weber barbecue) so this was quite an experiment for me!

Here’s the recipe:

Venison Jerky

1.2 kg (2 ½ lb) venison, sliced into thin strips

1/3 cup apple cider vinegar

1/3 cup Worcestershire Sauce and Mushroom Soy mixed together

1 ½ teaspoons salt

4 cloves garlic, minced finely

1 teaspoon dried chili flakes (optional)

2 tablespoons brown sugar

Boning out the shoulder took some time, but with a good knife, some fine music and podcasts to listen to, I was pretty happy. The trick is to cut with the grain of the meat and remove as much of the sinew as possible along the way, but the end result is worth it. Also, instead of wasting all those bits of sinew, I got a stockpot out with a head of garlic, a roughly chopped onion, a few bay leaves, my homemade Tuscan seasoning and some dried celery leaves. Once I finished boning out the shoulder, I added the bones, covered it all with cold water and wine and let it simmer for hours. The next day I skimmed off the fat and let it simmer again for a few more hours. Once it had cooled, I strained the remaining liquid and it was absolutely wonderful. I’ve potted it up and frozen it for rainy day soups, casserole and risotto bases.

In the meantime, back to the jerky. I peeled the garlic and started chopping it. Once it was reasonably small, I sprinkled the salt over it and, using the flat of the blade, really started the mash the garlic. I got out my biggest plastic lunchbox with a tight sealing lid and put the salty garlic mash in the bottom with the sugar and chili flakes. Then I added the wet ingredients and carefully mixed the whole thing. Adding the venison strips was a messy business, you really need to use your hands to massage the mix into the meat. Finally, I covered the container and put it in the fridge overnight. I did squish it around some more before I went to bed, but it isn’t really necessary.

The next day, I put thin strips of marinated venison on the dehydrator trays and lovingly placed them in the machine. The smell was gorgeous and I think this marinade would make a wonderful stir fry or slow casserole too. Using vinegar and the high salt content of both the soy and Worcestershire sauce did a great job and really drew out a lot of the moisture content from the meat as well as flavouring the strips.

To start, I put the temperature up high on the dehydrator (74 C/165 F) for the first half hour. This is recommended because I don’t use a nitrite “cure” for the jerky and it is necessary to kill off potentially nasty bacteria before drying proper. Botulism is dangerous and I take food safety seriously. Then I brought the temperature back to 63 C/145 F and processed it for just over 6 hours. This will vary with different dehydrators.

The results were excellent – chewy, delicious, dark and spicy! I’ve bagged it into little packs and for extra safety, will keep it in the freezer and pull out some as needed.  I’m going to try this with other meats (especially cheaper cuts of beef and rabbit) but the cider vinegar and salty soy combo is certainly worth repeating.

I hope you’re all well and happy wherever you are on this beautiful planet ❤

Aioli – The Love Affair

Hi everyone,

I just posted a pic on Facebook of a batch of Aioli I made this afternoon and one of my friends asked for the recipe. Easy done I thought, I’m sure it’ll be on my blog somewhere – but I couldn’t find it! High time I rectified this incredible oversight!

I’m not a true mayonnaise connoisseur like some of my friends and in truth, I rarely eat it. I do like to make this however in summer and autumn, when eggs are plentiful and garlic is still fresh and pungent. And I dug late potatoes this morning, a Dutch cultivar called Patrone that are apparently a fabulous salad potato. I’ve never grown them before, so this week will be full of interesting taste tests 😀

Home grown/made potato salad and Aioli is one of those dishes that is sex on a plate, everything about it screams wonderful. The texture of the potato cubes, their earthy flavour against the rich, creamy Aioli, with the pungent garlic and the lemony tang at the finish. You get the picture? This is love! And I make this only three, maybe four times a year, when everything required is in season.

So, here’s the Aioli recipe. Please bear in mind several things. Firstly this uses raw eggs so always get them from a reliable source and be assured they are fresh. Secondly, that I make this by feel and taste and recommend that you do the same. I used 8 eggs for this batch as I’m giving a pot to a mayonnaise-obsessed friend too. My rule of thumb is a clove of garlic per egg yolk and it works well for me. The finished Aioli will keep for a week in the refrigerator, though it usually disappears very quickly at my place!

Aioli 

Egg yolks                  Fresh minced garlic             Olive oil                 Lemon juice           Salt

In a clean bowl separate the eggs (I freeze the whites for later use in baking). Crush, peel and mince the garlic (I sprinkle a little salt on the crushed, peeled cloves and mash it in with the flat of a cook’s knife, making a particularly fine mince). Add this to the eggs and beat them well until they’re frothy. Here, you can use a hand beater but I prefer a balloon whisk.

7 eggs that looks like 8 – spot the double-yolker!

Very slowly add the olive oil while beating the egg mixture. A thin drizzle is best – you really don’t want this to split! (I put a teatowel on the bench to stop the bowl from flying away too). For my 8 egg yolks I used  a very generous cup of my Basil Oil for an extra summery note but any good extra virgin olive oil will be fine. Keep beating until the consistency is like thick cream. Once you’re happy with this, start adding the lemon juice. I recommend beginning with half a tablespoon per yolk and do a taste test. Adjust as needed and add seasoning if you want. Pot up, label and refrigerate immediately.

Apart from making the sexiest potato salad dressing in the world, this is wonderful with chicken, fish, green salad and as a dipping sauce.

Enjoy 😀

Stay well friends, and I’ll see you soon ❤

Addio Estate – Harvest Time

It’s that time of year again, the beginning of autumn when the bounty of summer comes in. And like so many of us who grow our own food, I’m feeling a bit inundated at the moment!

So far, I swapped some of my egg glut for a bag of crabapples and elderberries for jelly making; pickled and dried nectarines off our tree; dug and bagged potatoes (and I’ve still got more in the ground); eaten and dried so many beans; vainly tried to stem the attack of the killer zucchinis; dried enough prunes for the coming year but still the kitchen looks like it’s overflowing with plums now I’ve finally got the last of the fruit off.

Then there’s the tomatoes.

Some of you might recall I talked about some volunteer Roma tomatoes that survived winter in the worm farm and germinated in November. Well, quite a lot of them came up in one of the wicking barrels! I thinned the plants out and over the last month picked about 4 kg (just shy of 9 lb!) of perfectly delicious tomatoes.

Summer has been a very mixed bag here in Tasmania with much cooler temperatures and more rain than usual, and it seems we’re getting more balmy weather now that we’re officially into autumn. Everyone’s been complaining that tomatoes are slow to fruit, smaller than average and so on, but I think the flavour has been outstanding!

I don’t normally grow a lot of tomatoes but I decided to go for it this summer so I could bottle fruit as it ripens for use in winter stews and curries. This is reflected in the varieties I chose – Principe Borghese, San Marzano, Polish Giant and Debarao. These are all in various stages (the Debarao are still flowering) but I did bottle the first kilo of San Marzano this week and they are fabulous!

I didn’t factor in for the Roma crop (it was quite a surprise!) and that’s come in earlier than the rest. So I decided to make that wonderful Italian pantry staple, Passata. It’s kind of like making your own pasta sauce, totally to your taste and giving your winter meals a touch of those sun-kissed summer days.

Three things to note before we start. Firstly, I don’t blanch and peel the fruit for this as it takes a lot of time and basically I’m lazy. (In truth, I’d just blanched a couple of jars of small San Marzano tomatoes for bottling and was running out of time that night). Instead, I put the whole thing through the blender and the skins break down beautifully doing it this way. Secondly, I used a combination of Basil, Marjoram and Oregano because that’s what I had close at hand and we love those flavours. Sage, Thyme, Italian Parsley and even a little Rosemary would be just as good. And finally, this recipe uses chilies – another fruit I have in abundance here! – but it’s just as delicious without them, so don’t feel compelled to use them 😀

Deb’s Chili Passata

2 kg ripe Roma (or any plum-type) tomatoes             1 onion, chopped

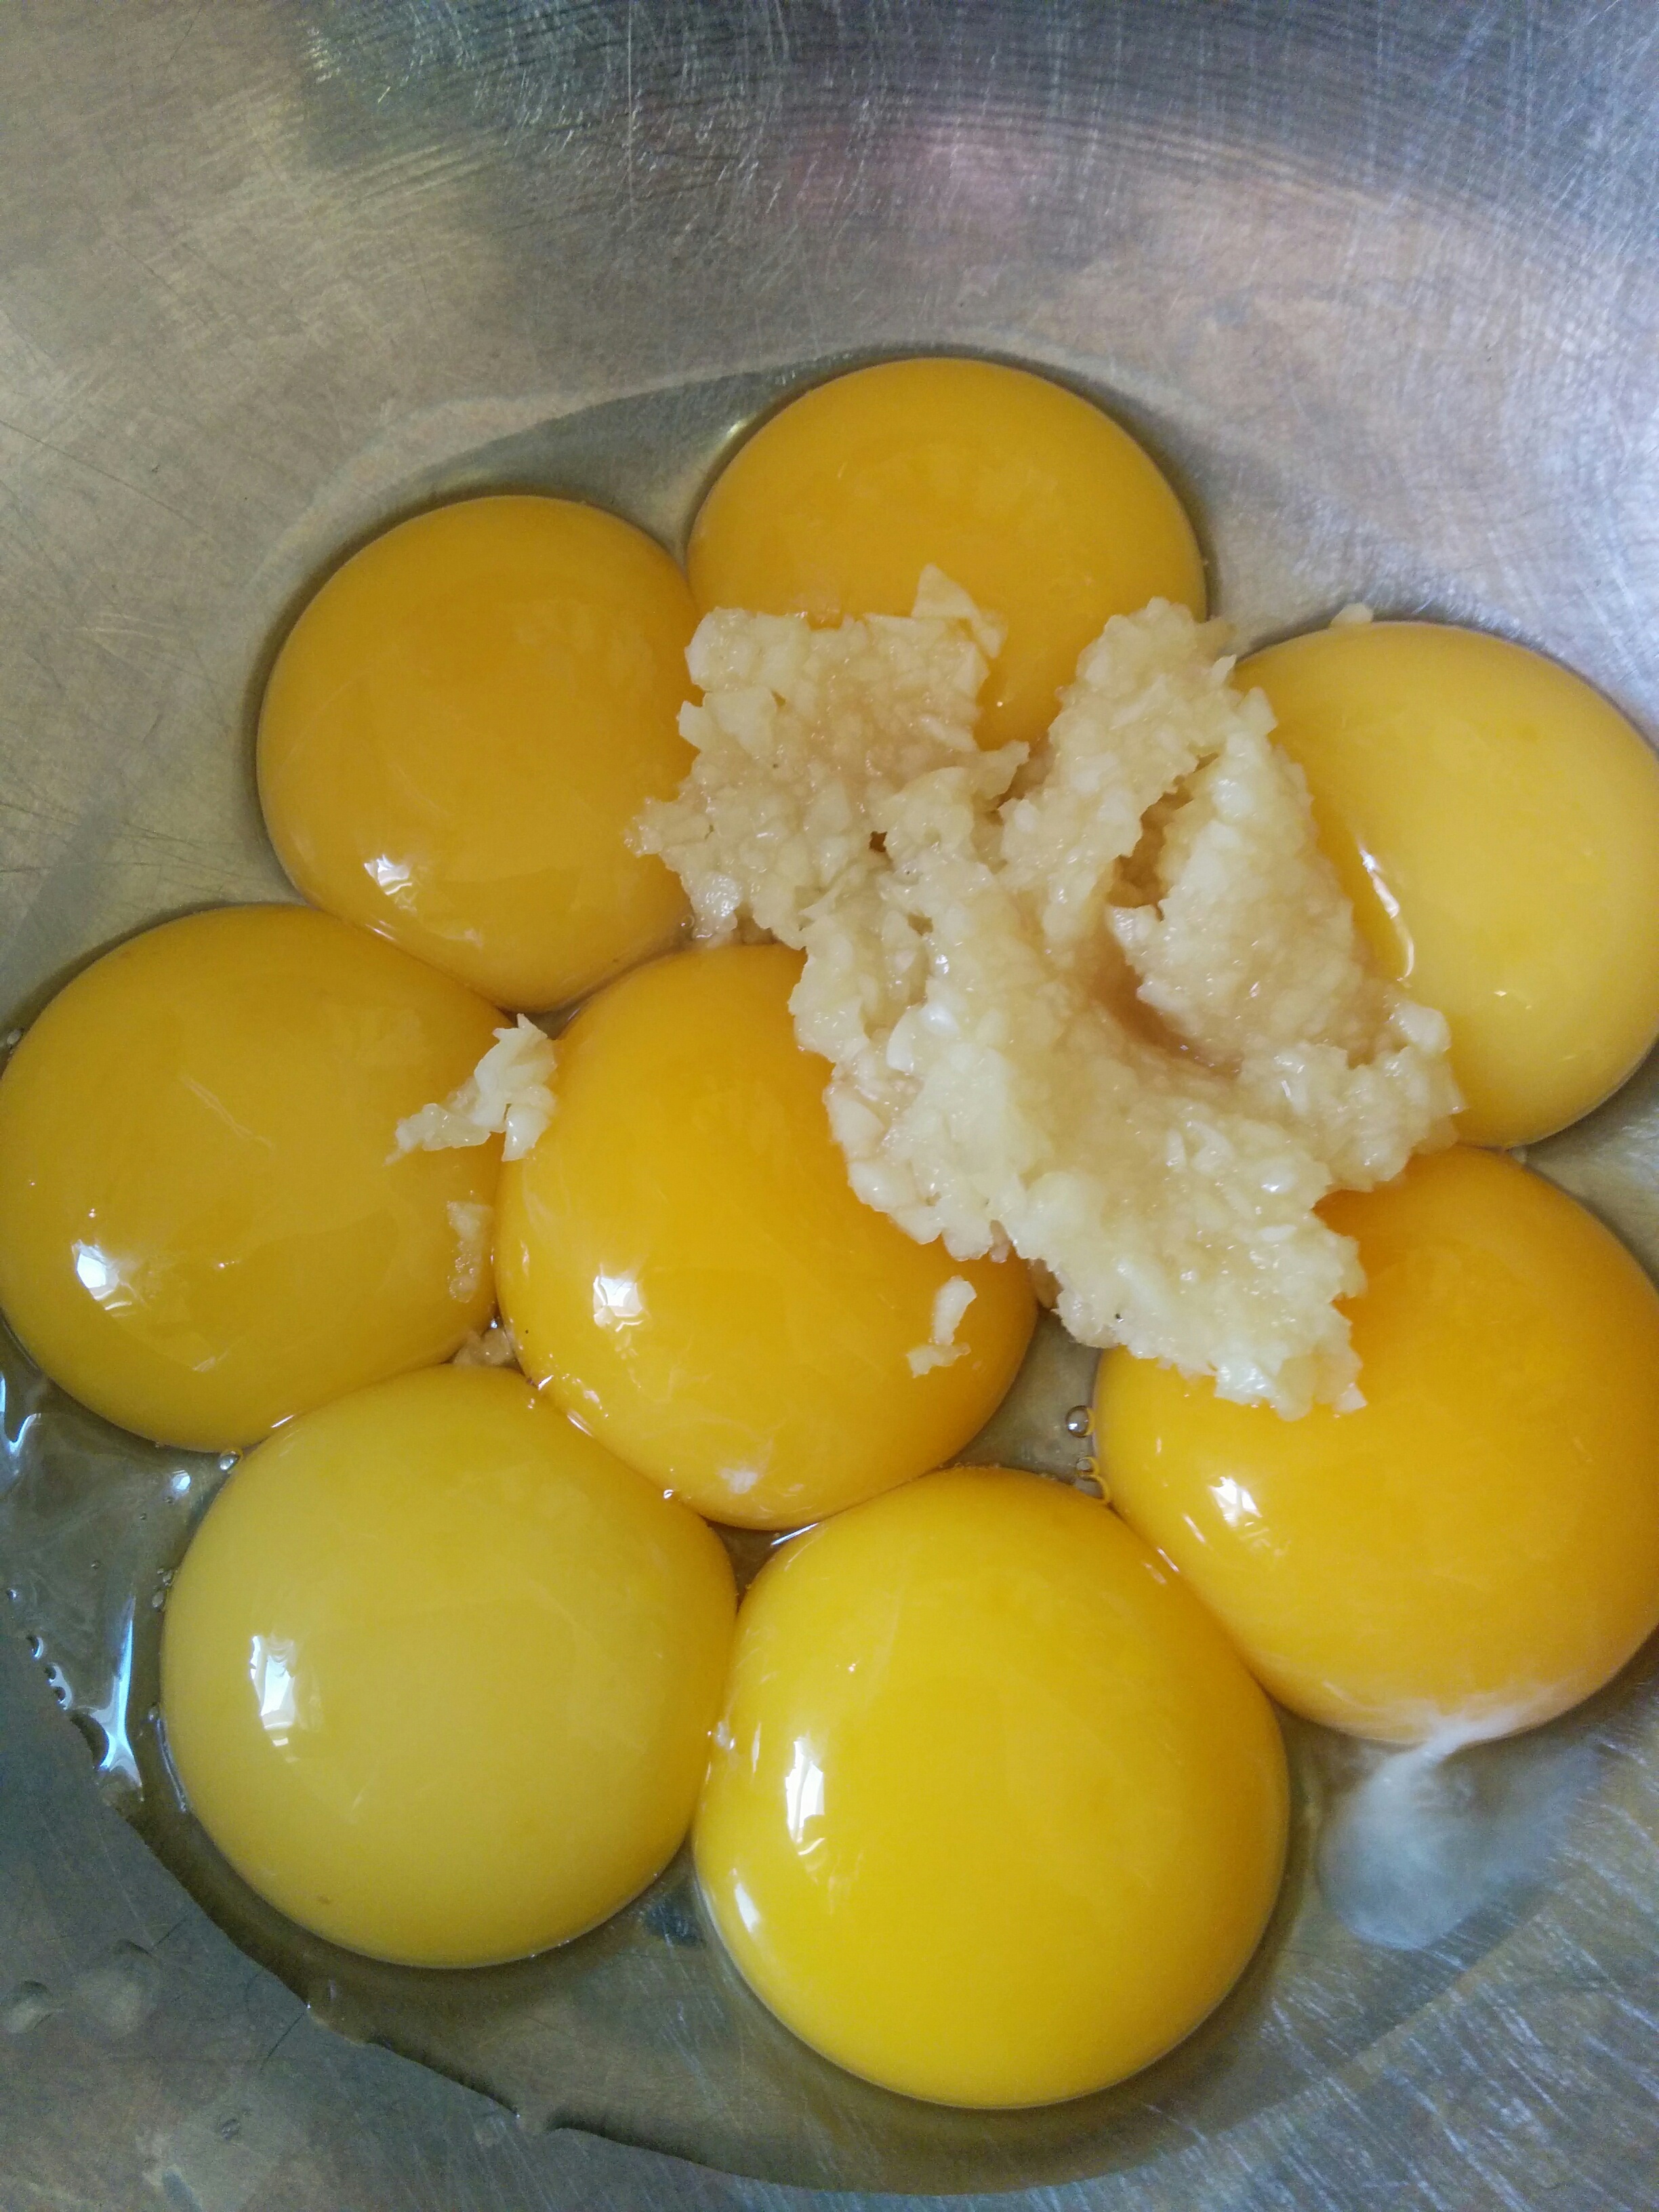
1 head garlic, peeled                                                         6-12 chilies, chopped (optional)

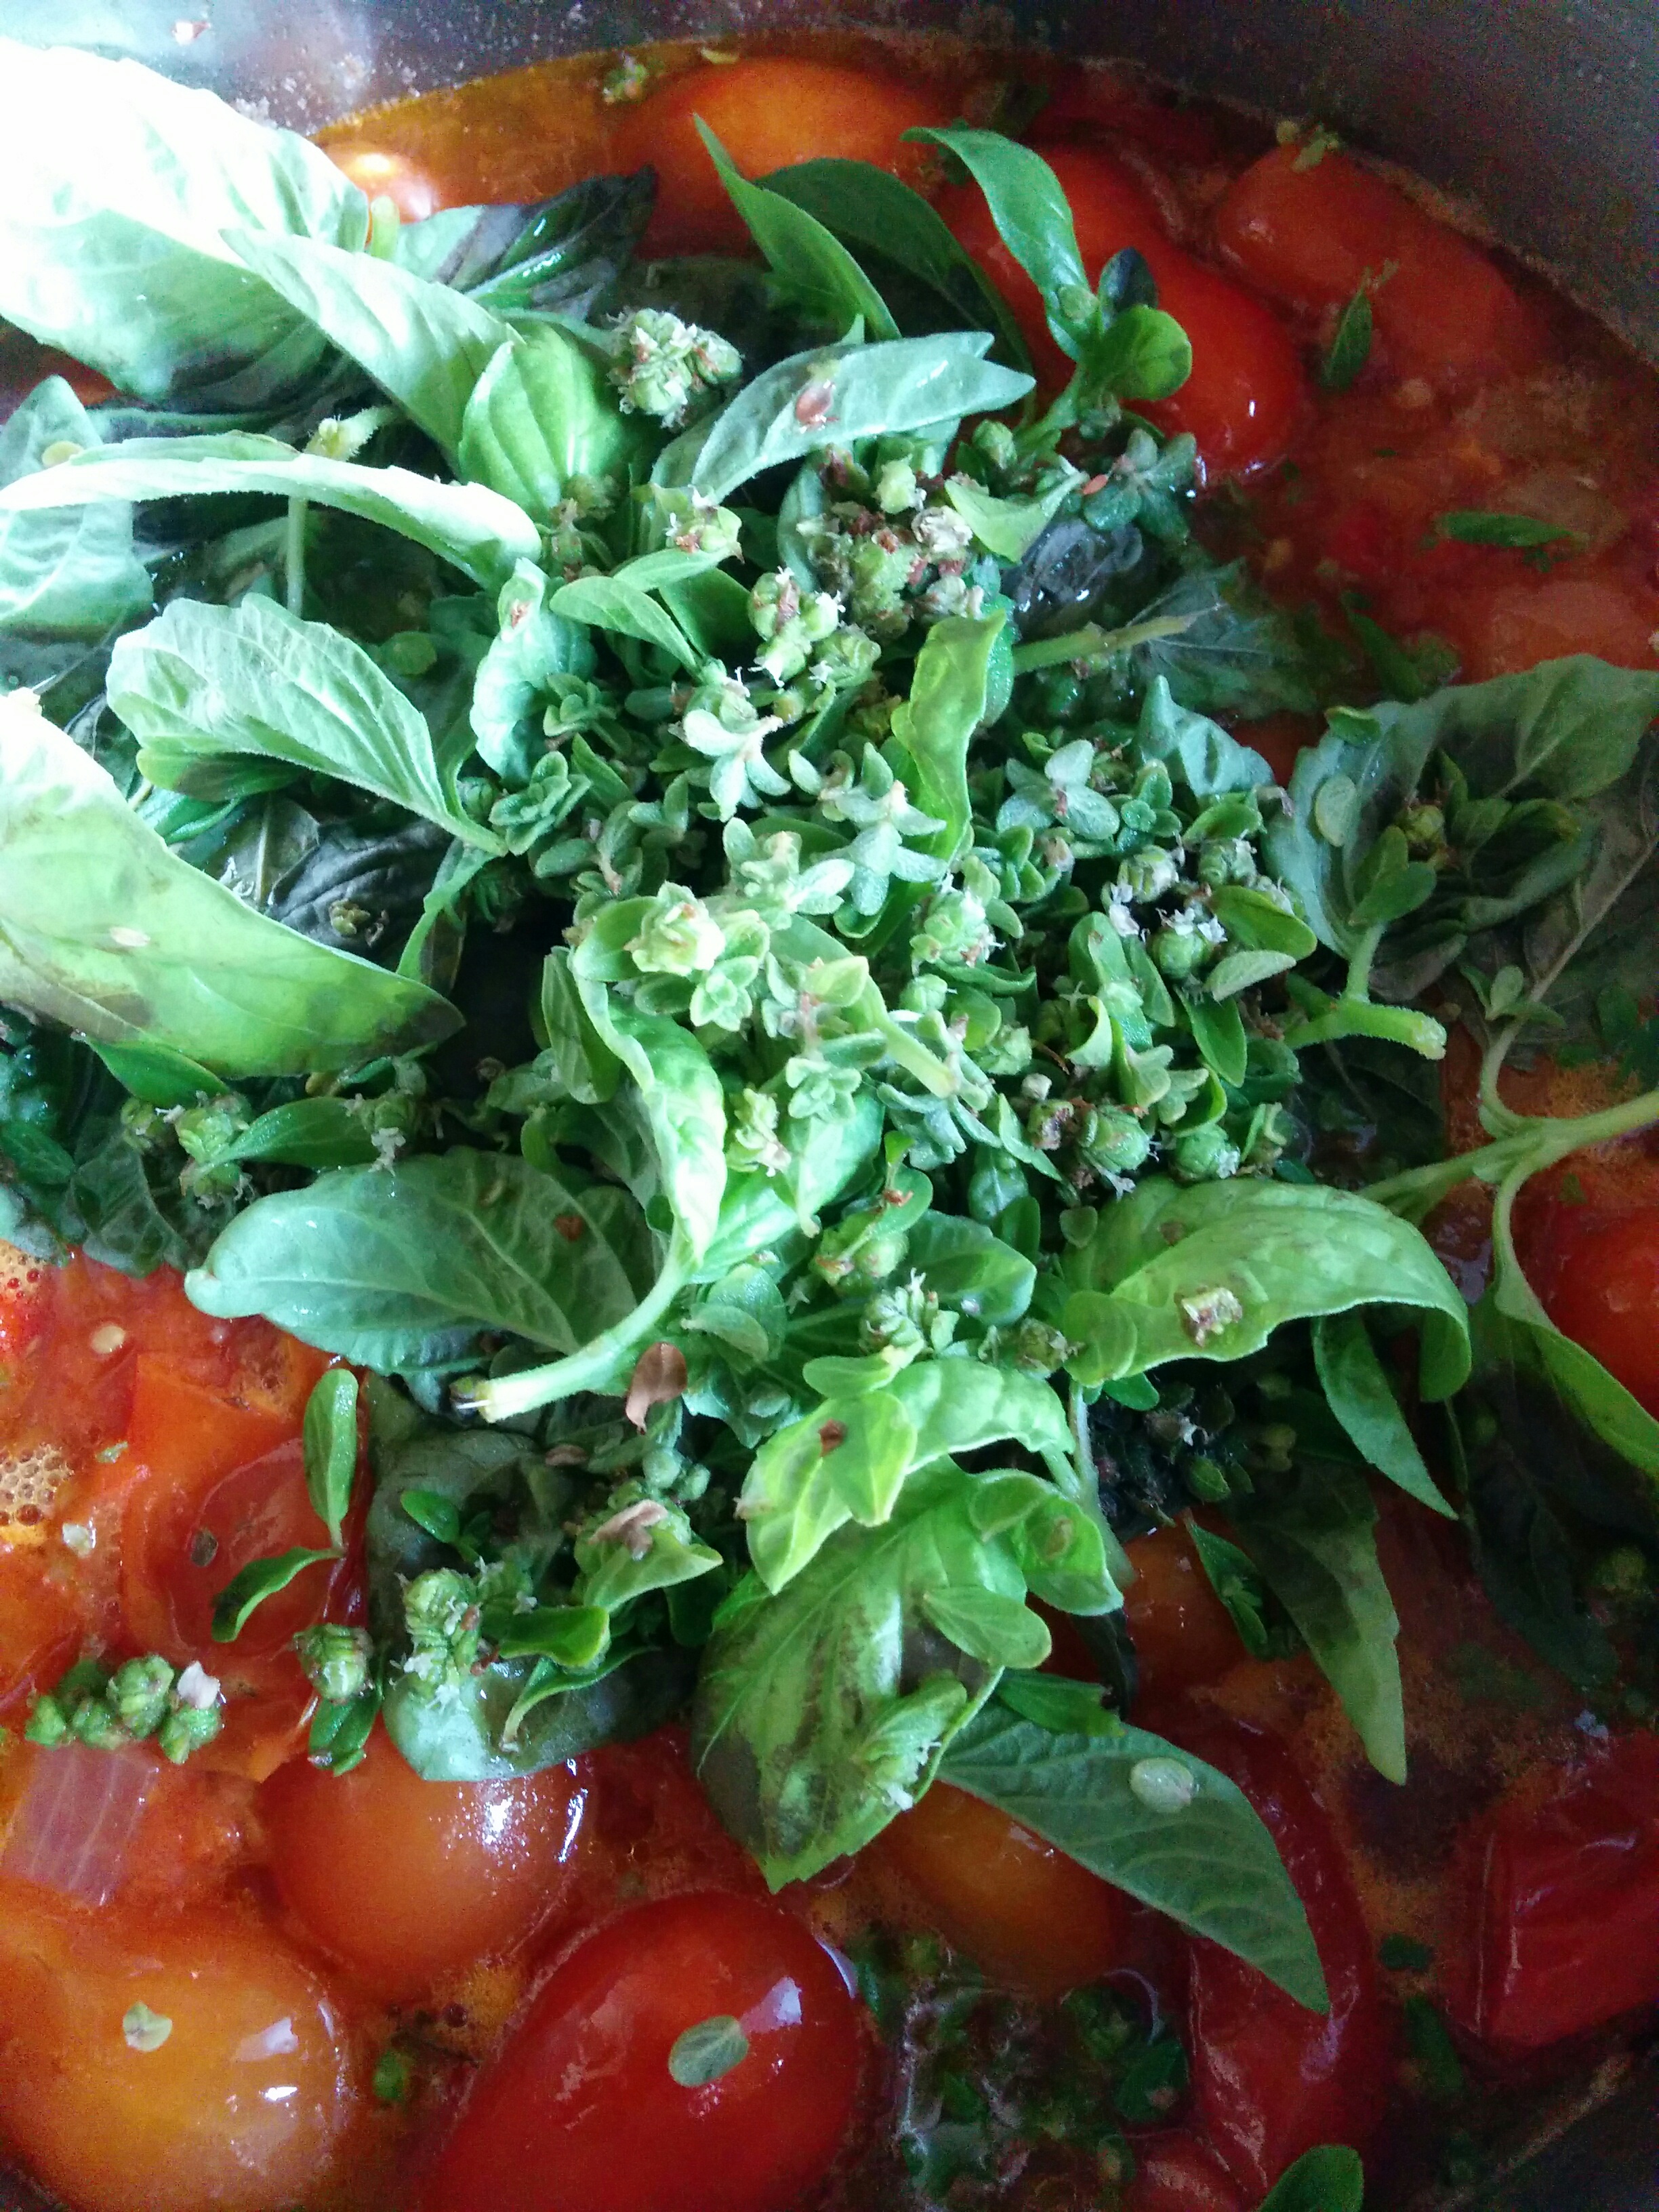
2 tabs basil oil                                                                   ½ cup fresh basil

¼ cup oregano &/or marjoram                                     1 tab honey

¼ cup minimum Marsala or red wine                           salt to taste

Wash the tomatoes, remove any stems, bruises, etc. Put them in a large stockpot with the oil, garlic cloves, honey, onion, wine and chopped chilies. Heat slowly over a low heat until the tomatoes start to sweat and mash down. Stir occasionally but leave the lid on as much as possible.

Add the fresh herbs and continue cooking until it starts to look like a tomato soup. Season it to taste. Take off the heat, cover and leave overnight.

img_20170301_192014

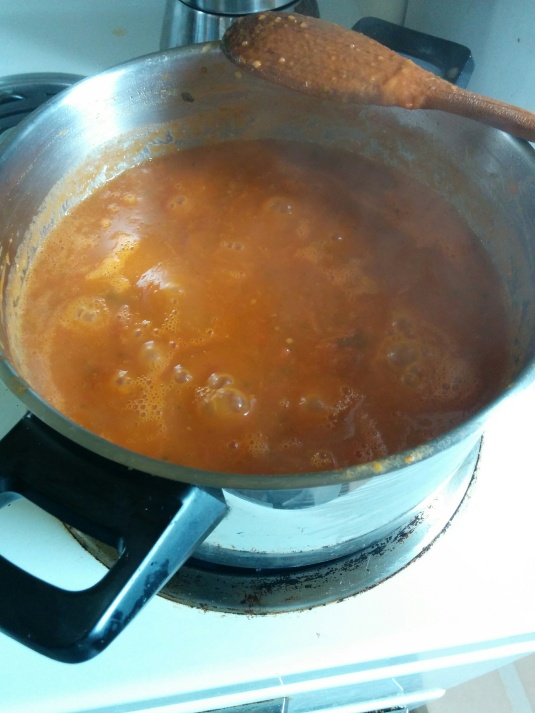
The next day, put the cold tomato mix through a blender and pulse to the desired consistency. Clean and sterilise jars/bottles and lids/tops. Put the blended mixture back into the stockpot and reheat. Boil gently for at least two minutes. Take off the heat and prepare a tall stockpot for a water bath (or Fowlers Vacola or Ball canning/bottling vat).

img_20170302_172847

Ladle the hot Passata into sterilised jars, add ¼ or ½ tsp of citric acid to each jar, cover securely with sterilised lids and place in water bath. Bring the water up to the boil and hold for 20 minutes with the lid on. Turn off the heat and leave the jars to continue processing for another 15 -20 minutes.

Remove the jars carefully (they will be very hot) and put them on a board to cool. Check for a seal, label and store in a cool place. This will last unopened for up to a year but mine never lasts that long!

img_20170303_131441

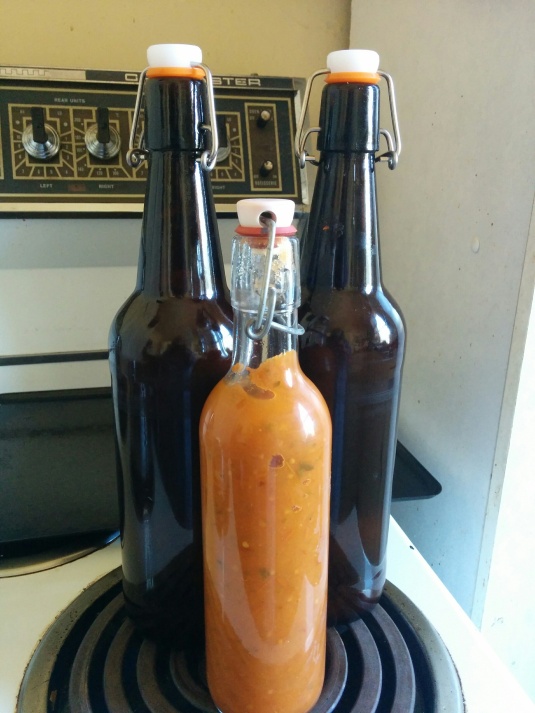
This recipe made just over 2 liters and can be bottled in smaller jars as well – I just have lots of swing top bottles this year!

Enjoy, and if you try this recipe I’d love to hear what you think of it 😀

Take care and talk with you all soon, I have to go make Plum Butter now………..